 Loading... Please wait...
Categories
Our Newsletter
Current Top Sellers
-
1
-
2

-
3

-
4

-
5


- Home
- Assembly & Care
- Kennel Door Installation
Kennel Door Installation
Download a PDF of the kennel door installation instructions here (note there are not photos on the download).
REQUIRED TOOLS |
RECOMMENDED TOOLS |
PARTS |
| Phillips head screwdriver | Electric drill | 1 locking pin |
| Slotted screwdriver | Electric saber saw with blade | 1 door and cowl assembly |
| Crescent wrench | 1/4- and 3/8-inch nut driver | 1 Back plate & 1 Front plate |
| Hand saw | 3/16-inch drill bit | Six #10 x 32 x 1/4" bolts (rain cowl) |
| 3/16-inch drill bit | Phillips head screw bit | Sixteen #10 x 1/2" Phillips head screws |
| 3/8-inch drill bit | 3/8-inch drill bit | Six #10 x 32 nuts |
| 1/16-inch drill bit | 1/16-inch drill bit | Six #10 lock washers |
|
1. Attach the kennel door/cowl assembly to the front plate with six #10 x 32 x ¼" machine bolts, lock washers, and nuts. Fasteners should be snug but not fully tightened.
Ensure that the dog door flap swings freely without striking the front plate. If the door makes contact with one side adjust by raising the other side of the cowl/rain shield. Fully tighten the fasteners when the door swings freely. IMPORTANT! Keep the locking pin in the top two holes of the rain shield when not used to lock the door open or closed. The pin in top position will prevent the door from becoming stuck open. If the door sticks open with the pin inserted the two sides of the rain shield are adjusted to close to the door opening. Loosen the three bolts on each side of the cowl and push the sides apart. Fully tighten all fasteners. (Fig. 1).
2. Measure the dog's shoulders height. Use the dog's shoulder height measurement plus 1" for the location of the top horizontal cut.
3. Cut an opening of 14" wide x 16" long on the surface of attachment (Fig. 2).
4. Using ten #10 x ½" Phillips screws, fasten the front plate and dog door/cowl assembly to the front side of the surface of attachment as shown in Fig. 3. Fig. 4 shows the reverse side of the pet door attached without the back plate attached.
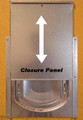
5. Using six #10 x ½" Phillips head screws, attach the back plate to the opposite side of the front plate as shown in Fig. 5. If a closure panel is used, align the holes on the two closure panel tracks with those of the Kennel Door’s back plate. Attach the closure panel tracks with the six screws provided to secure the back plate to the inside wall surface. Ensure that the dog door flap swings freely before tightening. Insert the closure panel into the tracks. Slide the panel up to allow the dog door to open and slide it down to seal the door opening.
LUBRICATE BETWEEN THE HINGE PIN AND BUSHING SEVERAL TIMES A MONTH WITH SILICONE LUBRICANT!
The rubber pet door bushings are a consumable part, much like tires on an automobile that is not covered under the manufacturer warranty. Replacement bushings sell in lots of 10 for $8.00. U.S. Postal Service is used for shipment. Delivery when using USPS is not guaranteed. For orders placed by mail, send check or money order for the amount to:
K-9 Kondo Inc.
|
|


