 Loading... Please wait...
Categories
Our Newsletter
Current Top Sellers
-
1
-
2
-
3
-
4
-
5
- Home
- Assembly & Care
- Dog Dens 3 Assembly Instructions
Dog Dens 3 Assembly Instructions
Click here to download printable Dog Den 3 assembly instructions without figure graphics »
View our Dog Den 3 assembly video at the bottom of this page.
CAUTION! WEAR EYE PROTECTION AND PROTECTIVE GLOVES DURING ASSEMBLY
|
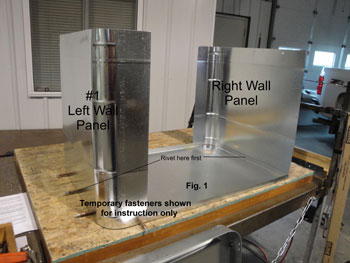
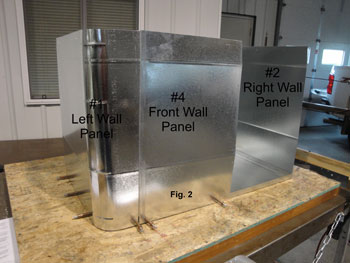
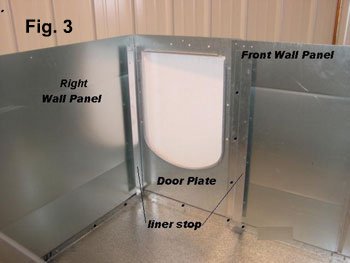
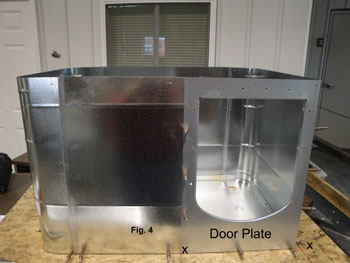
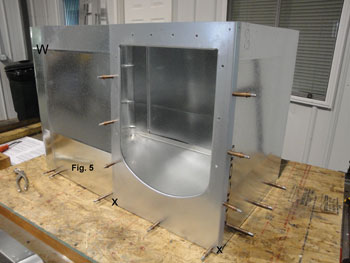
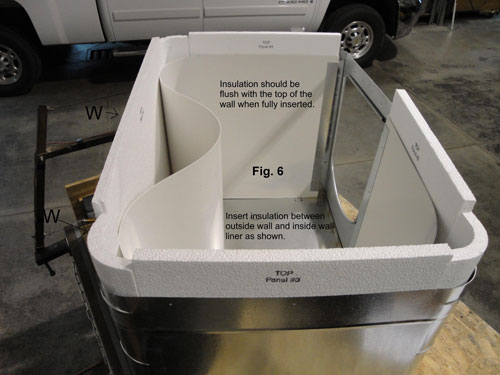
1. All doghouse kit wall panels attach to the outside of the floor tabs. Align the prepunched holes of the left wall panel #1 (has a radius corner on each end) with those on the left tab. Attach the panel to the tab with one rivet in the center hole. See Fig. 1. Align the remaining prepunched holes in the wall and floor and ream with a 9/64 bit and attach with rivets. Do this step on all prepunched holes to ensure the best possible fit. Attach the wall panel to the floor tab with rivets. 2. Attach the right wall panel #2 to the tab with one rivet in the center hole. Align the prepunched holes of the right wall panel with those on the right floor tab. Ream each hole with a 9/64 bit and fasten with rivets. See Fig. 2. 3. Insert the edge of the Dog Den doghouse back wall panel #3 fully into the groove of the right and left wall panel. The panel has a notch on each bottom corner that faces towards the floor. If the groove is too tight, use a screwdriver to widen the groove by inserting the tool’s wedge along the length of the groove in several places. Align the prepunched holes of the back panel with the floor tabs, beginning with the center hole, and attach with rivets. 4. Attach the front panel #4 in the same manner as shown in Fig. 2. 5. Align the prepunched holes of the doorplate, front wall panel, right wall panel, and liner stops. The doorplate overlaps the front panel. The rivets connect the doorplate, front wall panel, right wall panel, and liner stops shown in Fig. 3 and 5. You have to drill the rivet holes wherever an “X” appears. 6. Make sure that the edges of the kennel panels are pressed fully into the grooves of the front and back panel. Drill a 9/64" hole through each panel groove and wall panel approximately 6" from the top edge of the walls as marked by the W, as seen in Fig. 5 and 6. Fasten with rivets. This keeps the kennel walls in place when inserting the insulation and prevents the top from being wider than the bottom. 7. Install the insulation panels in the following order. Insert the front edge of the right wall insulation panel #1 between the liner stop and wall. Push the panel down until the bottom edge is flush with the floor. Insert one corner piece in right rear corner and trim if necessary to make it flush with the top of the wall. Install the front panel #2 with the long edge inserted between the wall and liner stop. Install the left front corner piece. Install the left wall panel #3. Install a corner piece in the left rear corner. Install back panel #4 on the back wall. Dog Den 3: #1 Right wall panel measures 29.25" x 24"
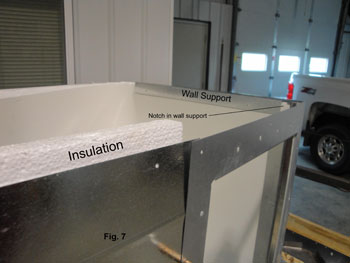
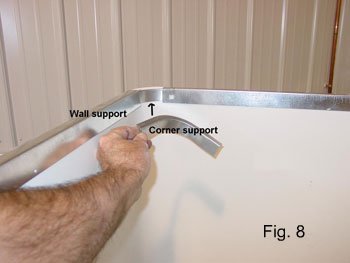
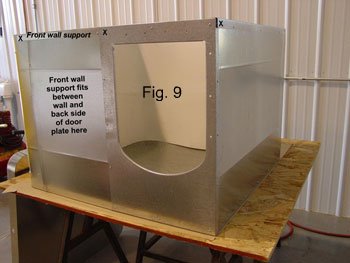
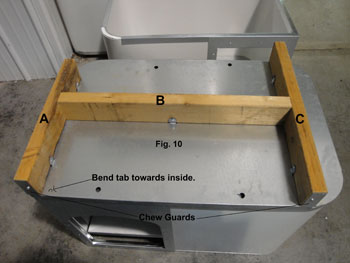
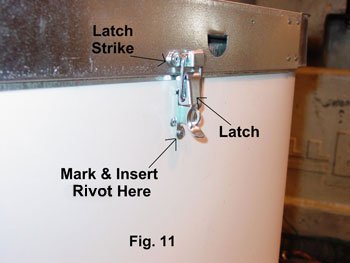
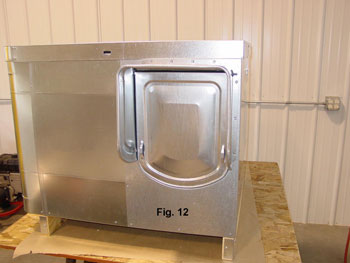
9. Invert the steel inside floor and place the precut 3/4" insulation within its rim. Insert the steel floor into the Dog Den with the steel side up. Push the floor down until it rests evenly on the floor. Note: The floor can be easily removed for doghouse cleaning. 10. The wall supports come in two lengths. Dog Den 3 The right pet house wall support measures 31 1/4" in length and has a notch on one that faces the right front corner. The front support also measures 31 1/4". The left and back wall supports measure 28 3/4". Install the right wall support with its end near the corner overlapping the corner support. The notched end must be at the 90° angle over the right pet house wall panel and inside wall, but under the doorplate lip. With the short bend on the outside, align the holes and attach with rivets. The last hole on each end of the support must be drilled and riveted. Do not drill holes in the liner yet. Install the corner supports. Install the back and left wall supports using the same procedure as used on the right support. See Fig. 7, 8, and 9. Install the front wall support with the right half of its length placed between the front wall and doorplate. Align the prepunched holes of the wall and wall support and attach with rivets. Drill and attach with rivets at the three “X”’s on the front wall support as shown in Fig. 9. 11. Make sure that the inside wall is tight against the insulation. Drill and rivet the remaining wall supports to the liner and inside metal corners. Pressing the ends of the supports tightly against the liner with pliers or other clamping tool will ensure a snug fit. 12. Drill and attach the liner stops to the inside wall. 13. Construct a support frame from pressure treated 2 x 4 lumber as shown in Fig. 10. Dog Den 3: A = 31 1/4", B = 26 5/8", C = 33 3/4"). Use a screwdriver to lift the five (some models have six) metal floor tabs to form a right angle with the floor. Attach parts A and C to the floor by inserting one of the 14 sheet metal screws through each tab into the wood as shown in Fig. 10. Insert one deck screw through parts C and A into part B. Attach the dog chew guards to the ends of the 2 x 4 lumber using two sheet metal screws on the dog chew guards. Do not over tighten. See Fig. 10. 14. Attach the kennel door/cowl assembly to the front side of the doorplate with ten #10 x 32 x 3/8" machine bolts, lock washers and nut. Do not fully tighten bolts. Ensure that the dog door flap swings freely without striking the front plate. If the door makes contact with one side adjust by raising the other side of the cowl/rain shield. Fully tighten the fasteners when the door swings freely. IMPORTANT! Keep the locking pin in the top two holes of the rain shield when not used to lock the door open or closed. The pin in the top position will prevent the door from becoming stuck open. If the door sticks open with the pin inserted the two sides of the rain shield are adjusted to close to the door opening. Loosen the three bolts on each side of the cowl and spread the sides apart. Fully tighten all fasteners. See Fig. 12. APPLY SILICONE LUBRICANT BETWEEN THE HINGE PIN AND RUBBER BUSHING WEEKLY. REPEAT THIS STEP MORE OFTEN IF THE DOOR RECEIVES HEAVY USE. 15. Peel off the paper from the doghouse weather stripping as you push the adhesive side of the doghouse weather stripping to the top of the wall supports. 16. Place the detachable lid on the top of the wall. Allow the latch to hang from the latch strike that is attached to the left and right sides of the detachable lid. Mark the location of the bottom hole of the latch on the wall with an ink pen or pencil. Attach the latch to the wall by inserting one rivet in the bottom hole at the spot marked. Insert one rivet into the top hole. See Fig. 11. Additional Doghouse Kit InformationThe rubber kennel door bushings can be consumed much like car tires. Please note, the bushings are not covered under the manufacturer warranty. Replacement bushings sell in lots of 10 for $8.00. U.S. Postal Service is used for shipment. Delivery when using USPS is not guaranteed. For orders placed by mail, send check or money order for the amount to: Visa/MasterCard are accepted for telephone orders. For orders placed by mail, send check or money order for the amount to:
K-9 Kondo Inc.
|
            |

